
Five simple ingredients—milk, cream, vanilla, eggs, and sugar—form the foundation of a dessert that beautifully marries richness, elegance, and ease of preparation, making it an ideal choice for special occasions or a delightful indulgence on an ordinary day. Crème Brûlée, a classic confection, is a creamy pudding renowned for its smooth, velvety texture, which contrasts wonderfully with the crunchy layer of caramelized sugar on top.
This burnt sugar not only adds a unique sensory experience but also enhances the delicate vanilla notes that infuse the dessert. Beyond its French name, Crème Brûlée is also referred to as “Trinity Burnt Cream” and “Crema Catalana,” reflecting its widespread appeal and cultural significance. The exact origins of Crème Brûlée spark lively debate among Great Britain, Spain, and France, each claiming to be the birthplace of this delectable treat. Regardless of its disputed beginnings, Crème Brûlée has captivated taste buds worldwide, becoming one of the most beloved desserts in both restaurants and homes.
Making Crème Brûlée at home is a gratifying endeavor that invites you to delve into the art of dessert-making. With a touch of patience and attention to detail, anyone can craft this sophisticated dessert, impressing friends and family with its stunning presentation and exquisite flavor. Whether served in individual ramekins or on a larger platter, Crème Brûlée is a true celebration of culinary delight that continues to enchant generations, securing its place as a timeless favorite on dessert tables.
To me, every kitchen appliance is useful and nothing’s overrated. When I look at my little espresso machine, I don’t see coffee. I see a steaming valve as an opportunity to make amazing crème brûlée.
-Grant Achatz – American chef and restaurateur
Jump To Section
- What Is The Origin Of Crème Brûlée?
- Torch Vs. Oven’ Broiler: Which Is Better For Brûléeing?
- Crème Brûlée: 13 Essential Tips For Perfection.
- How To Make A Perfect Crème Brûlée At Home In 13 Easy Steps
What Is The Origin Of Crème Brûlée?
The origins of Crème brûlée spark passionate debates among food enthusiasts, as England, Spain, and France all assert their claim to this classic and delectable dessert. Each nation boasts its tales and customs regarding the creation of this sweet indulgence, adding to the intrigue of its history. The term “crème brûlée” likely derives from the traditional methods employed in its early preparation. Historically, a heated metal iron was used to scorch the dessert’s surface, resulting in a delightful caramelized crust. Today, however, the most prevalent techniques for caramelizing sugar involve blowtorches or oven grills, which yield equally delicious results more practically and safely.
In the 17th century, the British had a unique custom of branding the coat of arms of Trinity College onto their desserts with a hot iron. While this practice may seem odd by modern standards, it served as a way to personalize and elevate the dishes served. To this day, the British refer to Crème brûlée as “Trinity Burnt Cream,” a nod to this historical tradition. Although the use of the hot iron has largely faded, these utensils are still displayed in schools as a testament to their rich culinary heritage.
Meanwhile, the Spanish have their version of the dessert, known as Crema Catalana, which they assert originated in Catalonia in the 18th century. This recipe is often linked to local festivities and celebrations. While similar to Crème brûlée, Crema Catalana features subtle differences in preparation and ingredients, making it a cherished delicacy in Spanish culture.
However, the French present the most compelling case for having invented Crème brûlée. The dessert gained widespread popularity in France during the 19th century, becoming a staple in restaurants and homes alike. The first printed recipe titled “Crème Brûlée,” closely resembling modern versions, appeared in the 1691 edition of the French cookbook “Le Cuisinier Royal et Bourgeois,” authored by François Massialot, a chef at the illustrious Palace of Versailles. This work is regarded as a milestone in French culinary history and played a pivotal role in establishing Crème brûlée as one of the nation’s most iconic desserts.
Despite the various claims surrounding its origin, Crème brûlée continues to enchant palates worldwide. Its harmonious blend of creamy texture and caramelized sugar crust makes it one of the most sought-after desserts, often featured in fine dining establishments and enjoyed in homes by people of all ages. Crème brûlée has transcended its historical roots, evolving into a symbol of haute cuisine that celebrates the rich culinary traditions of the countries that lay claim to it.
Torch Vs. Oven Broiler: Which Is Better For Brûléeing?
You know that delightful golden-brown crust that forms atop custard, offering an irresistible texture and a delightful contrast of flavors? This delectable layer is created through a process called brûlée, which involves applying direct, intense heat. The term “brûlée” comes from French, meaning “burned” or “caramelized with fire,” perfectly describing what occurs when the custard’s surface is subjected to high temperatures. There are two primary methods for effectively caramelizing this topping, allowing you to select the one that best fits your cooking style and available tools.
The first method involves using a culinary torch, which provides precise control over the heat intensity, enabling you to caramelize the surface evenly and quickly. This technique is favored by chefs for its impressive results and visually appealing presentation. The second method utilizes the oven grill, making it a great alternative for those without a torch. When using the grill, it’s crucial to monitor the time and maintain an appropriate distance between the custard and the heat source to avoid excessive burning. This approach can yield a perfectly golden and crispy crust that beautifully contrasts with the creamy custard beneath.
Whichever technique you choose, understanding how each one works and which aligns with your preferences and equipment is key. This knowledge will allow you to create a classic and sophisticated dessert that is sure to impress your guests and provide a memorable dining experience.
Blowtorch
Blowtorch
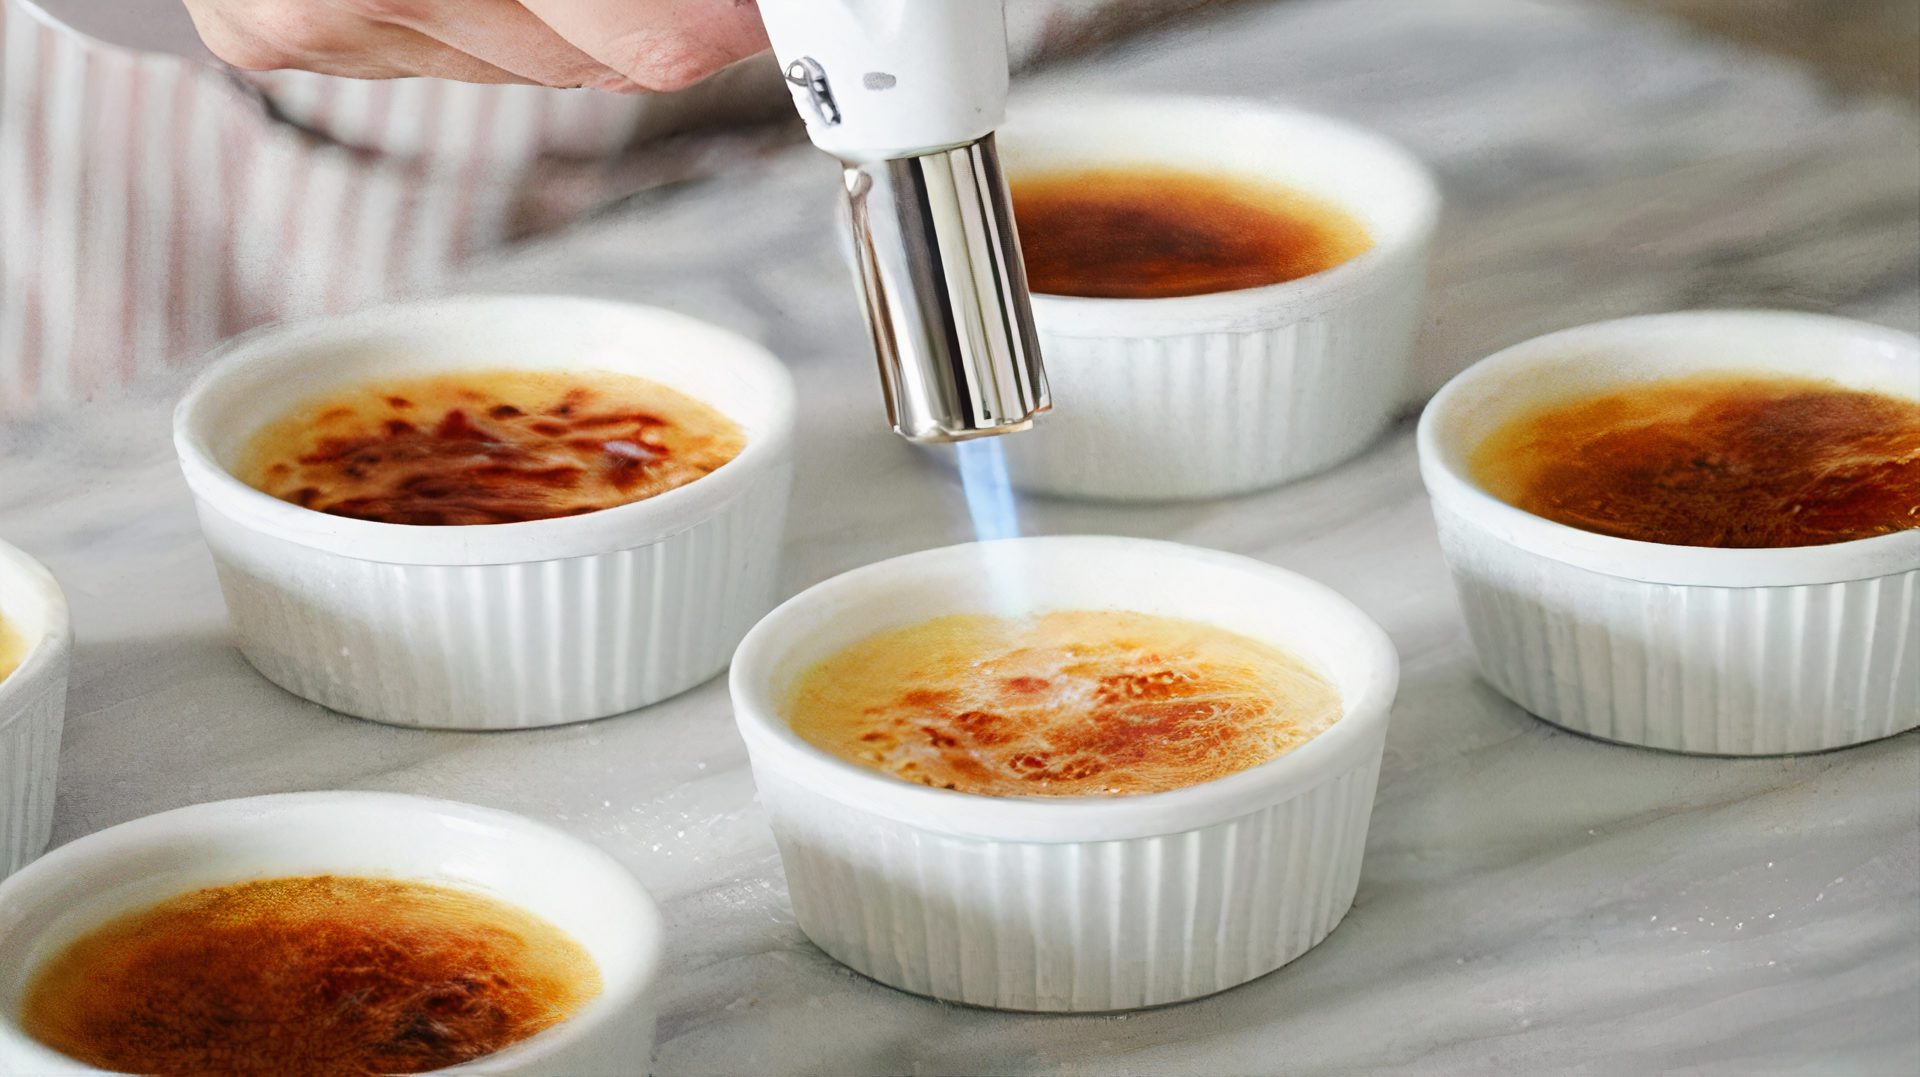
The blowtorch is undoubtedly the go-to tool for culinary professionals seeking to caramelize desserts with efficiency and precision. This versatile device is distinguished by its direct and adjustable flame, making it perfect for quickly melting sugar or other ingredients that enhance our favorite sweet treats. With its compact and functional design, the blowtorch is readily available at specialized kitchen stores and online platforms, making it accessible to anyone eager to elevate their cooking skills.
While the blowtorch is user-friendly, it’s crucial to exercise caution and practice to achieve safe and satisfactory results. When igniting the blowtorch, position the flame about 5 cm from the dessert’s surface to ensure optimal caramelization. The caramelization point can vary significantly based on the dessert type, the cook’s preferences, and the ingredients used. For instance, sugar caramelizes rapidly, while other components may need longer exposure to the flame.
Additionally, handling the blowtorch requires extra vigilance; always adhere to the manufacturer’s guidelines to prevent accidents. Although this tool is compact—approximately 15 cm long—making it easy to transport, it is important to note that blowtorches are not allowed on airplanes. Even when empty and packed in checked luggage, safety regulations prohibit carrying such equipment. Therefore, when purchasing your blowtorch, remember that it cannot accompany you on air travel, or you risk being without this invaluable tool that can elevate your desserts in flavor and presentation.
In summary, the blowtorch is an essential ally in the kitchen, but it demands responsibility and care for safe and effective use.
Oven Broiler
The top element, commonly referred to as the oven grill, can achieve the same caramelization effect as a blowtorch, but it requires careful attention. Unlike the blowtorch, which allows for direct supervision, the grill caramelizes inside the oven, making it harder to monitor the process. This increases the risk of burning the sugar in just seconds if not watched closely. However, this method is particularly advantageous when preparing multiple servings of crème brûlée at once. While a blowtorch can only caramelize one dessert at a time, the oven grill enables you to work on several portions simultaneously, maximizing your efficiency in the kitchen.
Using the grill is simple. Begin by setting the oven to its highest temperature and placing the crème brûlée with a generous layer of sugar on top. Allow the sugar crust a few seconds to bubble, indicating that caramelization has begun. At this stage, vigilance is key, as the sugar can quickly transform into a golden, crispy crust. Keep a close eye on it until the caramelization is complete, ensuring the crust achieves the ideal balance of crispiness on the outside and softness within. With a bit of practice and attention, you can create stunning desserts that elevate your culinary skills.
Crème Brûlée: 13 Essential Tips For Perfection

There are a couple of tricks to achieve the traditional crème brûlée. Following these 13 tips, you will get a perfect cream with a golden-brown crust on top.
- Avoid spoiling the preparation: Break individual eggs into a small container before adding and mixing with other ingredients. A bad egg can spoil the entire preparation.
- Room temperature eggs: Allow the eggs to warm to room temperature before combining the ingredients. Cold eggs will probably result in scrambled or curdled eggs when introduced to heat.
- Temper the yolks: Egg yolks coagulate between 149º – 158ºF or 65º – 70ºC. To avoid scrambled eggs when mixing with hot liquid, temper the yolks by whisking about 1/3 of the warmed cream and milk. This way, the mixture temperature will have enough time to rise without breaking your recipe.
- Prefer brown sugar for brûléeing: Brown sugar gives a rich flavor to dessert, while superfine sugar, like powdered sugar, burns quickly.
- Whisk gently: Over-whisking the ingredients will Introduce too much air compromising the final texture of the dessert. Just combine all ingredients enough to incorporate fully.
- Prefer using vanilla bean: Commercially available vanilla flavorings are made from lignin, a chemical compound in wood. The vanilla bean is a small pod from the Vanilla planifolia orchid, native to Mexico. The world’s best-selling spice is cut lengthwise, and its tiny seeds are scraped off and incorporated into other ingredients. The pod is not discarded. It is mixed with the hot liquid to extract most of its flavor.
- Check the vanilla’s freshness: If you can make a tiny knot in a vanilla pod, it is a sign of freshness, and the inside is soft, plump, and juicy.
- The authentic Crème Brûlée: Sieve the custard before placing it into ramekins. The only solid components that go through to the sieve or Chinoy are vanilla seeds. They float across the custard and settle in the bottom of the ramekins. When you scoop and see the little black seeds, it signifies authentic Crème Brûlée.
- Prepare ahead: It is the perfect dessert to make in advance by keeping it in the fridge covered with plastic wrap for up to two days before serving. When it’s dessert time, add the brown sugar and burn it.
- Nappé Consistency: In French cuisine, nappé is the term given to the cooking of a cream that acquires a creamy and dense texture. To check if the crème brûlée has reached the right point, dip a spoon in the cream, and as you run your finger along the back of the spoon, the “trail” formed by your finger will have to remain.
- No cracks: Using a water bath méthod, the cream cooks evenly at a constant temperature, ensuring that there is no rapid expansion of heat that can form a crust on the top and crack before is fully cooked. The steam rises as the water heats, helping to prevent the top of the custard from becoming too dry.
- Water limits for water bath: Fill the roasting pan with hot water until it reaches halfway up the sides of the ramekins, transferring the heat to the cream gently, which prevents the custard from curdling.
- Burning the top – blowtorch or oven broiler, but after burning the top, leave the dessert to rest for five minutes before serving so that the sugar hardens and the ramekins cool down.
How To Make A Perfect Crème Brûlée At Home In 13 Easy Steps
In this topic, you will learn how to make a perfect Crème Brûlée At Home.
So, get to work! 😋

Crème Brûlée
Equipment
- Pairing knife
- 4 6 oz ramekins
- Measure cup
- Mixing Bowls
- Whisk
- Sieve or fine chinoy
- Blow torch optional
- Roasting pan
- Saucepan
- Dishcloth
Ingredients
- 6 pcs Egg yolks
- 375 ml Cream
- 125 ml Milk
- 75 g Sugar
- Brown sugar For sprinkle and burn
- 1 pc Vanilla bean replace for 1 to 2 teaspoon of vanilla extract
Instructions
- Preheat the oven 300ºF and boil enough water for water bath.
- Place the milk and cream in a saucepan.
- Split the vanilla bean in half lengthwise, scrape the seeds and add to the milk and cream along with the pod.
- Bring to a boil over medium heat. Remove from the burner and let infuse the flavor.
- In a large bowl, mix in the sugar at once over the egg yolks, whisking until light yellow color. About 2 min.
- Pour about ⅓ of the hot milk and cream into the yolks for tempering. Pour in all liquid until combined.
- Strain the custard mixture through a fine mesh sieve into a large measuring cup.
- Divide custard mixture evenly filling about 2/3 up the sides of the ramekins.
- Place the dishtowel on the roasting pan. Arrange the ramekins onto it to prevent them from slipping on the baking sheet.
- Place into the oven adn fill with hot water until halfway up the sides of ramekins.
- Cook for about 30 min or until almost fully set with a somewhat steady center.
- Remove from the oven and transfer the ramekins to a tray. Let cool down for about 1 hour.
- Cover the ramekins with plastic wrap. Chill in the fridge for at least 3 hr or up to 2 days.
To Serve
- Sprinkle a layer of brown sugar onto the custard and burn with a blowtorch or use an oven broiler until the sugar melts and caramelizes.
- Wait 5 minutes before serving to cool the ramekins and allow the sugar crust to harden.
Notes
Bottom Line
In summary, crème brûlée is a dessert that masterfully blends simplicity and flavor. While its preparation may initially appear daunting, it is surprisingly accessible, making it suitable for even novice cooks. With a rich base of egg yolks, sugar, and cream, topped with a crisp layer of caramelized sugar, crème brûlée delivers a distinctive tasting experience.
The delightful contrast between the velvety cream and the crunchy burnt sugar is sure to please a wide range of palates. Thus, if you seek a dessert that will wow your guests without demanding intricate culinary skills, crème brûlée is undoubtedly a superb choice.
Did you make this recipe?
Leave a comment below and share our content. Help our community grow through social media.
Don’t forget to tag @gastrovinoacademy on Instagram and hashtag it #gastrovinoacademy.
Cheers 🍷


Normally I do not learn post on blogs, but I wish to say that this write-up very pressured me to try and do it! Your writing style has been surprised me. Thank you, very great post.
Howdy! This is my first visit to your blog! We are a collection of volunteers and starting a new initiative in a community in the same niche. Your blog provided us useful information to work on. You have done a marvellous job!
Its like you read my mind! You seem to know a lot about this, like you wrote the book in it or something. I think that you can do with a few pics to drive the message home a little bit, but instead of that, this is magnificent blog. A fantastic read. I’ll definitely be back.